I’ve been very humbled to have a couple of my images appear in the BBC’s Sky At Night Magazine, with one landing me one of their prizes. I love taking pictures of the Moon. I think it’s one of the easiest objects in the night sky to help practice your astrophotography skills. It’s not without its challenges though. It’s a big bright object that gives you the opposite challenges to those faint objects that require long exposures. Generally for me I follow these very simple rules:
- Sharpness as much as possible across the entire image. However, it’s a curved surface so sharpness at the edges – or specific features – are key.
- Good contrast without over-exposing. I keep to very short exposures around 10 – 20 msec (depending on sky and Moon brightness/contrast) with lowest gain of 100 in SharpCap
- Only capture 50-100 frames. I’ve tried more. I personally don’t think it makes much of a difference, but also depends on seeing conditions too. More frames = more time to capture and more time to process, and the quality you get from this is not linear.
This guide is designed to get you familiar with the capturing of the Moon from someone who, by luck and judgement, happened to have come away with some pretty decent images. Is it a definitive guide? No. Will it help you get going, get you familiar with the process? Yes! And maybe help you towards winning a prize now and again? I really hope so!
I’ll be covering shooting the Moon with an Altair Hypercam 183C V2 (a very good all-round “DSLR replacement” that handles Lunar, Solar and DSOs) using SharpCap.
What You Need
- Short focal length telescope (we want to capture the whole image without mosaics. If you’re looking at imaging the Moon using mosaics, look elsewhere!)
- Camera (I’ll be talking through using an astrocam, not a DSLR)
- Software such as SharpCap or AltairCapture (this guide details SharpCap but I did most of my early learning capturing the Moon using AltairCapture – I think it’s a little easier to use for a beginner, but learning the key features of SharpCap will get you further in the future)
- A mount that can do Lunar tracking
What You Don’t Need
- Top of the range, fully polar-aligned tracking mount
- A very large, expensive telescope
- A very expensive camera
- Lunar filter (they’re designed for visual use so as not to temporarily blind you on a bright Moon night, not astrophotography)
One of my most used pieces of equipment, before I settled on a more semi-permanent solution, was a powered motorised SkyWatcher EQ3-2 mount and a 72mm Altair Lightwave refractor. I used to very roughly align North, do no polar aligning, and just set to Lunar track. The Moon requires no long exposures so you have no worry about trailing. It moving slightly across view was more of an annoyance than affecting quality when it comes to processing. My image that won the Sky At Night image of the month was done at midnight, I threw my EQ3-2 out into the garden, set my rather heavy (for it) Altair Starwave 102ED-R onto it, grabbed a focal reducer that isn’t designed for it, took some images – and within 30 minutes I was back inside heading back to bed. Don’t be afraid to experiment! I also had huge success using my mono guidecam cameras – from a QHY5L-M and a GPCAMv2 130M. However, I do all my work, currently, using an Altair Hypercam 183C V2.
An optional, but highly recommended piece of equipment though (and required for remote imaging): motor focuser, such as the Pegasus Motor Focuser. This allows for that crucial fine tuning. Good Moon images are about crisp detail without fuzzy features.
How To Do It
- You first need to frame your image. For your equipment, you’ll know what you can and cannot fit into view and what you can focus. What I generally aim for is a fully centred Moon if it is full or near full. If it is partial – during its Waning (dark growing from the right as it approaches a new moon) or Waxing (light growing from the right as it grows to a full moon) phases, I still try to keep the imaginary whole Moon in the centre. That means the part that is left over is off centre when it is not a full moon.
- Ensure it’s rotated the right way. I try and match the orientation with what is in the sky. I’ve seen some great Moon shots that would look better if oriented correctly. Adjust to suit the mirrors of your set up of course – but be aware of correct orientation when it comes to processing.
- Ensure that your mount is set to Lunar tracking speed. In the EQASCOM control, this will be the Moon icon under Track Rate.Tip: If using CDC to navigate to the Moon, it will assume Sidereal rate. So ensure your EQASCOM control Track Rate is set to Lunar.
- Add any focal reducers if necessary to fit it all in view if your telescope and camera combination is a bit on the powerful side. I don’t use any Powermates or Barlows if it is the opposite. I like the wider-field view of the Moon through my TSAPO65Q equally as much as my fuller-frame view I get from my 102ED-R.
- If using a mono camera, it is recommended to add an IR Pass filter to the end, such as the Altair Premium IR Pass Filter. This brings out more detail – such as into the shadows cast by the mountains and crater edges.
- In SharpCap, set the following as a good starting point for the Altair Hypercam 183C. Adjust to suit your set up:
- Color: Mono8
- Binning: 1×1 (really don’t need any extra detail here!)
- Resolution: depends on your scope focal length and how much you want to capture in frame
- Exposure: 10-20 msecs as a start.
- Analogue Gain: 100
- Preview Display a little dark – or a little bright? Head down to SharpCap’s “Display Histogram Stretch” and click on “Auto Stretch” lightning bolt button:
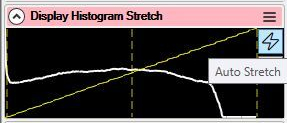 The goal is to have good detail without being too dark, or good light without washing out detail. Look for hot spots in your image – really white areas and try and adjust the exposure and display histogram until you’re happy with results. I tend to favour darker images with good contrast and if I need to bring out more light, I increase the gain slightly during processing. I also find it really depends on the time of day you’re taking the Moon images. During twilight or dawn, against a daytime or bright sky it’s a fine line between a bright sky and good detail of the Moon. Settings during the dark night, with a bright full moon will get you sliding the exposure time appropriately. Don’t be afraid to experiment – just bear in mind that the processing software is not a miracle worker – you will only get good results from good images you feed into it. If it doesn’t look right in SharpCap, it ain’t going to look much better when you’ve spent 30 minutes stacking it!
- Now focus! Subtle detail will be brought out if you spend time concentrating on what you’re focusing on. I tend to focus on the details of the mountains and craters at the terminator (shadow meets light) line when it comes to Moon shots during its various stages, but then I try to equally get the edges into focus too. Using SharpCap’s live display, zoom in to the detail and use your fine focus control to subtly adjust the image quality. When you’re happy, zoom back out and you’ll get a good idea of how sharp the end result will be.

Note the above is a RAW12 (Colour) format. I tend to take images in both and process each, depending on what the resultant image I’m striving for. If you have dust smudges showing on your preview, don’t worry – we’ll remove them in processing using Flats. - At this point I change my Output Format from SER to FITS. The auto format for these fast captures is SER but I tend to have problems processing them afterwards in PIPP, Registax and AutoStakkert!3. Press the auto button to turn the auto format off and enable you to change SER to FITS. Your mileage may vary here, but don’t forget – capturing these images at this stage is only half the battle.
- I then click on Start Capture and collect 100 frames. At 10-20 msec each, this takes about 15-30 seconds to complete – depending on how fast the images can go from camera to hard drive.
- We’re not done yet. Calibration frames (Flats, Darks, Bias)… They tend to be overlooked because people assume over-complication, or generally lack of ability to do them. There are some good guides on these, but the technical detail may be too much. Darks remove any hot pixels and stray light from the sensor. We’re taking very fast shots for this to be an issue, so don’t waste your time. Bias also is more relevant to longer exposures – they remove the extra light of “normal process of light leaving the sensor” – you wouldn’t notice a difference processing these or not for your shots of the Moon. For calibration of Moon shots, I only take Flats. Flats remove the blobs of dust that appear. As we’re taking pics of something that gives a lot of contrast between the night sky and the bright object, these become quite apparent. I take Flats using a cheap USB powered B4 light panel.Whistle stop tour of how I do flats:
- I hold the USB B4 light panel over the end of the scope. I find sending my scope pointing up direct above helps here!
- Ensure it is set to it’s dimmest setting (and for most consistent flats, ensure you’ve covered your scope with a white t-shirt or some white cloth stretched over the end of your scope).

- Don’t move your camera! Moving the whole unit is fine – but the idea here is that you’re not knocking or moving any dust. Granted, rotating your scope to a different position may allow some dust to move, but use common sense and do some experimentation here. The odd dust spot can be removed in post-processing software like Lightroom if push comes to shove!
- I keep all settings the same as above, but adjust my exposure time down around 1/2 second at least, until the display histogram has the bulk of the curve at around 20-40%. I press the lightning bolt on the display histogram – at which point you’ll probably be shocked at how dirty your imaging is! Do not attempt to clean it at this stage… you need to make sure that dust is in the same position as when it was there for your lights – so your post-processing software can do the subtraction.
- I take about 30 images of Flats, again in FITS format.
- Remove the light panel away from your scope and you’re done. It’s that simple. At this stage I rename the capture folder to be “FLATS_<date_time>” so I can remember what I’ve done.
- That’s it. We can download the folders of FITS files and process them which we’ll cover in the next post.
What We Did
Taking images of the Moon involve the more basics of astrophotography setups. Using any astrocam and some decent software such as SharpCap or AltairCapture, you’re able to zoom into detail of our nearest celestial neighbour and really hone your focusing skills to concentrate on that particular aspect of image capture. Astrocams are very sensitive – they’re designed to capture the faint light so we’re dealing with fast captures for the Moon. This is why people talk about good planetary cameras – ones that allow good capture speeds and detail. The basic premise is that between your scope and the Moon (or planet) is a lot of atmospheric turbulence that affects the “seeing”. You’ll see this as you live view the Moon and you see it constantly wobbly – in and out of focus on parts. We can’t stop this, but what we can do is take enough pictures so that the magic of stacking software takes all the best bits from all the frames and convert them to one pin-sharp image. The more frames the better – however this is almost a dark art in itself. I’ve seen people talk of thousands of frames – heck, I’ve even taken 1,000 frames for one of my images. But another time I can get equally the same pin-sharp results from just 100. This is not a hard and fast rule, but a general guide to get you into that good place of a very good starting position to start learning more about the software and hardware needed to get great results in the future and I tend to balance taking a decent number of frames that get me to the processing stage quickly, without compromising quality.
In the next post we’ll look at processing these images using PIPP, Registax and AutoStakkert!3.
