My enjoyment of astrophotography has increased ten-fold since being able to control my setup from the comfort of my house. Rather than stand outside for long periods of time, or even having to jump in and out of the house all night checking on progress – I much prefer being able to guide, slew, focus and capture images from my office or in front of the TV!
This is not so much a guide, per se, but a walk through of what I have setup – and from this I’m hoping you’ll be able to tailor it to your needs.
What You Need
- Mini PC, Intel PC Stick or Laptop connected to your equipment running Windows 10 (Pro preferred)
- WiFi or Ethernet (LAN) connection to your outside kit
- Second Computer/Laptop to connect to your connected PC/Laptop
- ASCOM controlled Mount
- Motor Focuser
- Telescope
- Astro Camera(s)
- Optional, but recommended: good cable tidy management!
My remote setup is specifically:
- Gigabyte Brix i3 8Gb 500Gb SATA HDD
- I house this, and all the power and extension cables to my mount and equipment in a weatherproof boxes.

- I power my SkyWatcher EQ6-R Pro with a mains power adapter.
- I have an outdoor plug socket and outdoor extension cable running to my weatherproof box. I don’t use powertanks/batteries as my setup is static.
- I have a second weatherproof box that houses the data connection cables – so anything that pops out and connects to my equipment all comes from a second box. Of course if you have a large enough weatherproof box they can all live on one – I separate mine into “power” and “connectivity” as I expanded my equipment. In this second box lives
- Mount direct to my Gigabyte Brix Windows 10 Pro via an EQdir cable (no need for hand controller)
- QHYCCD Polemaster
- ZWO ASI294MC Pro Imaging Camera
- Altair GPCAMv2 130M
- Pegasus Motor Control Unit
- Pegasus Motor Focuser Control Unit lives in this box too.
- As this is a remotely controlled setup, being placed somewhere in my garden, WiFi strength was a problem for me. So WiFi was a challenge of where my Router/AP was setup to provide coverage in my home. To overcome this, I have put an outdoor TP-Link CPE510 second AP (Access Point) running in client mode dedicated to my telescope in my garden. This connects back into my home LAN and will be discussed in a future blog post on increasing WiFi connectivity to my kit.

How To Do It
The goal of this setup is to be able to do everything that you can do outside, from the comfort of your warm home, so therefore the following guides will help you acomplish this
- An ASCOM controlled mount
- That you have software that can control your mount to point to targets (e.g. Cartes du Ciel or Stellarium)
- You have software that can capture images (e.g. SharpCap Pro)
- You are able to focus your telescope remotely (e.g. Pegasus Motor Focus Control)
- Ability to remote desktop to this PC from another PC (see below)
To set up my remote PC (the device that connects to all my equipment outside) follow these steps to enable Remote Desktop (Windows 10 Pro only):
- In the Cortana search bar type in: “Remote Access” and select the “Allow remote access to your computer” option

- This will load up a screen that allows you to enable Remote Desktop. Set this up as described in the following screenshot. Note that if you are the only user of your remote machine, you will automatically be an Administrator which has Network Level Authentication. To enhance security, ensure that you select this option.
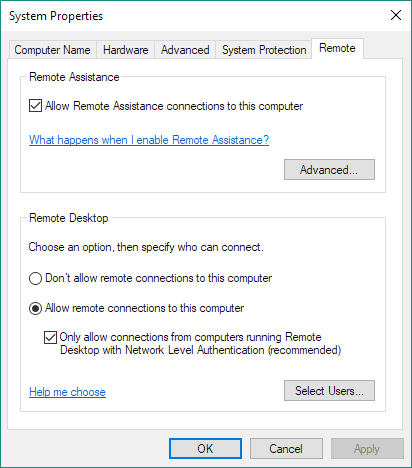
- Click OK
Alternatively, if your remote PC runs Windows 10 and not Windows 10 Pro, take a look at TeamViewer software.
Tip: If you are shopping for a remote mini PC, ensure it runs Windows 10 Pro and not Windows 10.
Why RDP over TeamViewer?
- RDP does not rely on an Internet connection – it runs as fast as your internal network speed allows. TeamViewer relies on your Internet connection and your Internet connection (which is much slower than your internal network in most cases) will determine the speed at which you can access your device.
- RDP is much faster. TeamViewer is probably “good enough” in a number of situations
- Downloading files from your remote PC will be much slower with TeamViewer than RDP because RDP assumes you’re running over your local network, so you have native access to SMB/CIFS (the protocol natively used in Windows for remote LAN shares). As Imaging amasses large files over a number of hours, please bear this in mind when transferring from your remote PC to another for post-processing. Of course, in some situations, transferring to a USB hard drive is probably regardless.
- RDP is one level of security higher, in that you do not need to create a remote account on a 3rd party service to access something that is completely local to you.
These are then the steps I follow each night (or day for solar or early Lunar) when I’m imaging:
- I turn on my equipment. The mount is permanently secured, and setup under a TeleGizmos 365 cover. I have a WiFi remote switch (hey, life’s too short to walk the few metres to turn on my equipment at the outdoor socket!)
- I place my SP3 into the weather proof box, ensure it has power (and powered on) and connect the USB3.0 cable from the USB hub to my SP3. I place the weatherproof box lid back on.
- I place my scopes onto my Mount and ensure they are balanced.
- I then RDP to my setup whilst I’m outside.
- This is my routine before I head inside:
- I run through my Polar align routine. This tends to be quick as this is a semi-permanent setup, but due to perhaps knocking and moving the mount slightly as I load my scopes, I need to check Polar Alignment each time. Usually takes 5-10 mins. I then shutdown the Polemaster software as it is no longer needed for guiding, slewing or imaging.
- I connect Cartes du Ciel (CDC) and connect my Telescope using the onscreen menu.
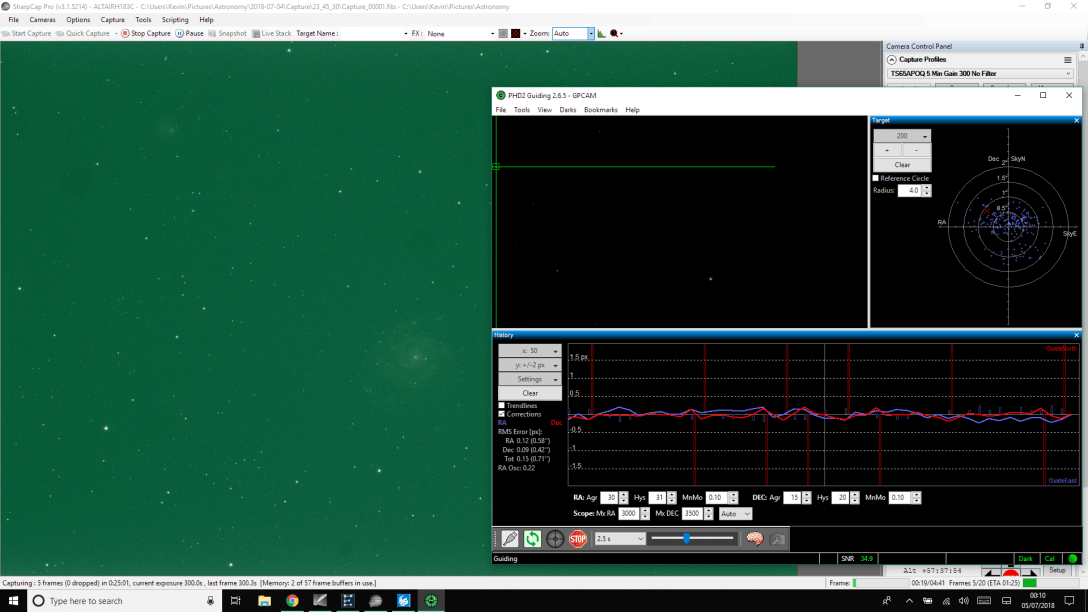
- I load up SharpCap Pro (SCP) and ensure my camera is selected (ZWO ASI 294MC Pro. I select a profile that is for star alignment (2 second exposure, Gain 300).
- I also connect my Mount to SharpCap Pro (thanks ASCOM!) so I can use the controls with SCP also, but it also has a very handy “platesolve” feature which is useful in the star-alignment phase.
- I select Vega, a bright star that I know where it is in the sky, in CDC and ask my mount to slew to it. This does two things:
- Checks for star alignment. If my alignment is off, I manually use the on-screen controls until Vega is centred on my screen. I then tell CDC to Sync the position. It asks to verify if my Mount is actually pointing at Vega and I say yes. CDC adjusts it’s positioning (not my Mount).
- Allows me to set my focusing using a Bahtinov Mask. I place this on the end of my scope and I use SharpCap Pro along with PegaSus Motor Focus Control to make very fine adjustments until the star spikes are perfect.
- Once done, I remove the Bahtinov Mask and set a longer exposure – around 15 seconds.
- On the Mount controls within SharpCap Pro, there is a button that looks like an @ sign. This is SCP’s platesolve button. Press it. What this does, is use a program like Astrotortilla (configured also with SCP) to solve the picture it has just taken. This makes fine adjustments to my mount, and CDC is updated appropriately to the real position.
- At this point I take the cover off my Guidescope that I use for auto-guiding, and fire up PHD2. I do a quick check that PHD2 can see things (but do not ask to auto-guide until I’ve a target in view).
- Once I’m happy with the fact I can correctly select targets, I take the laptop I use to remote desktop into my setup inside and begin my imaging.
WARNING! Whilst you can now control your mount and telescopes remotely without you being next to it, be aware that – without you paying attention – your telescope may inadvertently crash into your mount and tripod legs as you get it to slew from one part of the sky to the next. Be aware of the limits of your setup. The ASCOM software allows you to set limits. You can also add a pier extension to your setup (highly recommended) like I have, that raises your scope away from the tripod legs.
What We Did
Being able to remotely control your astrophotography setup allows you to take advantage of the time in between all the long exposures that are necessary with this hobby. It allows you to remotely check on your imaging session which is a bonus when you’re trying to appear “present” with your family as well as just allowing you to keep warm on those long winter nights.
We ensured that we had a machine, set up correctly like you would expect for any imaging setup – the exception here is that you can remotely desktop to it over a strong network connection. It is also important to note that to do remote imaging you need the following at a bare minimum:
- PC to remote desktop to
- All imaging controls can be done by a computer:
- Mount slewing
- Focusing
- Camera control
If you don’t have all of the above – and many people have far more advanced set ups – then you need to get that PayPal account dusted off and expect to spend a few more £ on some things!
What I found was that I needed to invest in good quality, and appropriate USB cables. USB3.0 has a length limit of 3 metres – you have to have active repeaters to make them longer. Any more than this and you need a powered repeater. This should not be of concern for you because the “remote” part of this set up is handled by WiFi, not long cables. We’re not sitting inside and trailing long USB cables to our equipment outside. That’s not remote. That’s just a door in between you and your setup! So have cables that are an appropriate length, that does not get tangled in your set up as you slew your scope around. Note that you do not need to have USB3.0 cables to do imaging. USB2.0 is more than adequate and often recommended – especially for DSOs where speed of transfer is not important. USB3.0 facilitates high data speed access – so useful for planetary – but people have been surviving doing great pics of planets using USB2.0 for years!
I also found I needed to understand the power requirements more – not down to the voltage level [I’m sure that’s important] but I have nothing special here. My extension power ports are all good quality, surge protected, robust and housed in appropriate weather proof kit. I run cable tidy trunking through my garden to my kit to ensure they’re safely contained and shielded.
Once you have this remotely set up, you won’t look back in how you can take advantage of this great setup.

2 thoughts on “The Remotely Controlled Imaging Setup”