The ASCOM Platform is the Swiss-Army Knife of software control for your various pieces of astrophotography kit – from mounts, to focusers, to dew heaters and even powered observatory roofs.
For us more modest amateurs though, the most important element that ASCOM needs to control, and usually the only required element, is the mount.
This recipe talks you through setting up ASCOM Platform 6 for a SkyWatcher EQ5 or EQ6 mount.
What You Need
- Access to the Internet to download ASCOM Platform 6, EQMOD/EQASCOM and Drivers
- A Windows 7, 8 or 10 PC
- SkyWatcher/Synta/Orion type mount
- Either a SynScan hand controller or EQDir cable (a cable that has the electronics of the hand controller for those that don’t need the hand controller, instead just a laptop)
- If using the hand controller, you’ll need a RJ11 serial cable and a serial to USB converter so you can plug it into your laptop.
How To Do It
1. Download ASCOM
First, you need to download the software. ASCOM 6.4 is the version available at the time of writing.
- Head over to https://ascom-standards.org/ and over on the right is a box that says “ASCOM Platform 6.4 [DOWNLOAD]”.
- Follow the instructions to run and install the software. It will check whether you need some pre-requisites, such as Visual C++ Runtime libraries and offer to install them for you.
- Once done you can click Finish and close the installation.
2. Download ASCOM Drivers
We then need to get the drivers for our particular mount. In our case, we’re installing the drivers for a SkyWatcher but you’ll get an idea of what ASCOM is capable of controlling by scanning down the list.
- Head over to https://ascom-standards.org/Downloads/ScopeDrivers.htm
- Scroll down to the SkyWatcher section. Here you’ll see that you’re able to download the following:
SkyWatcher SynScan Mount Controller (6.0.6262, June 2017)
- Run the downloaded program to install the drivers onto the ASCOM platform.
3. Discover COM Port (USB Serial Port)
Your mount will be connected to your laptop through a serial cable – either directly (using an EQDir cable) or via the Handset. Modern computers don’t have serial connections any more but have a USB port instead. USB stands for Universal Serial Bus, so hopefully this makes sense why we’ll be discussing this.
If you happen to have seen the EQMOD settings screen, there is a section on setting up the serial port, with a little search icon telling you it will discover the port for you. It won’t work for USB. And since there’s no easy way to do this – follow the steps below to find out what Serial Port your USB port has been assigned.
Tip: Under Windows 10, use Cortana search bar and type “Device Manager” and press enter, to skip steps 1 and 2 below.
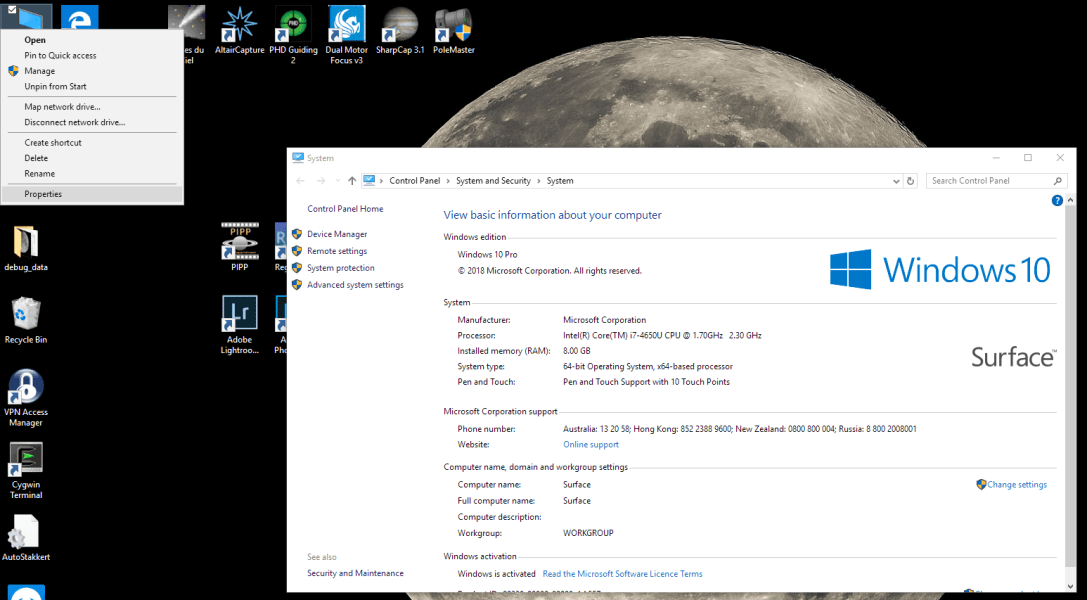
- Right click on This PC from your desktop and click on Properties
- Click on Device Manager
- The Device Manager tree you will see will be in alphabetical order, so search down the list until you see Ports (COM & LPT)
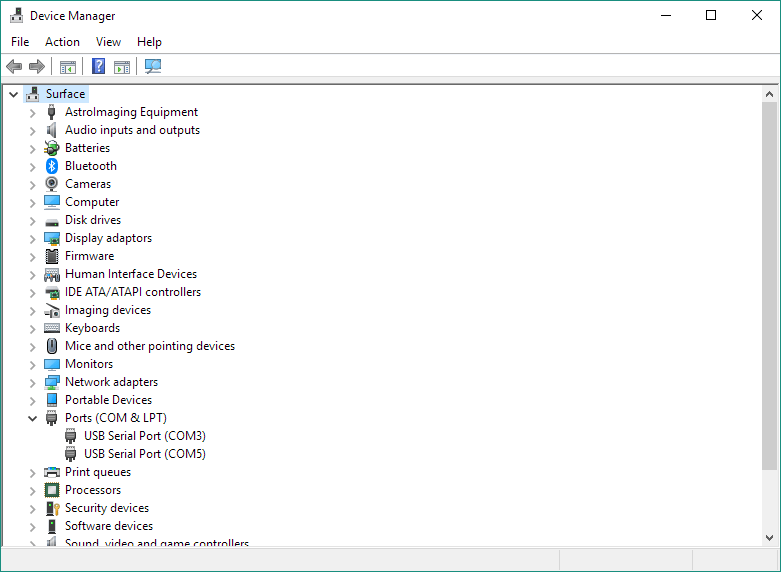
- Your mount will be one of the ports listed if there is more than one. Do you want to identify which it is? Possibly hard to tell from here but if you double-click one of them and check the Manufacturer. I have an EQdir cable attached to my mount and laptop directly and I know it is made by FTDI, so this shows up that in my case that COM5 is my mount.Tip: do not worry too much if you have it wrong, record each COM port number – it tends to be the one that is the greater number – and try each in turn when we get to configuring EQMOD. You won’t break anything – the worst it will say is that it can’t communicate with the mount (because you have the wrong port number).
4. Download EQASCOM
- Head over to http://eq-mod.sourceforge.net/eqaindex.html
- Follow the link to download EQMOD from sourceforge.net and then run the Setup program.
5. Configure EQASCOM for a SkyWatcher Mount
To setup your SkyWatcher Mount with ASCOM/EQMOD, carry out the following steps
- If you’re using the Synscan handset, ensure this is in PC-Direct Mode by selecting the option on your controller.
- The program to run, to set up a new mount under ASCOM is called “Setup EQASCOM” which you will find under the menu Start… EQMOD.Tip: Under Windows 10 you can use the Cortana search bar and just type in “Setup EQASCOM” and it will find the program for you
- This loads up a screen with lots of information needed. At this stage, we’re filling in:
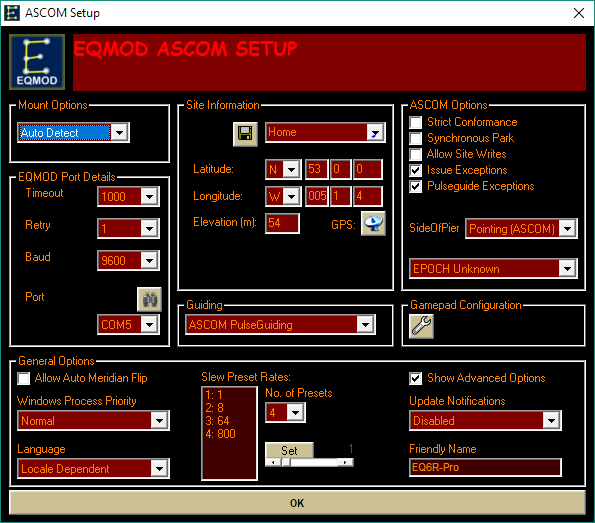
- Mount Options: Type of Mount it is (leave as Auto for now)
- EQMOD Port Details: The COM port from Part 3. Discover COM Port (USB Serial Port). Set as Baud 9600, Timeout 1000, Retry 1.
- Site Information (Your Location):
- Label (call it something like Home). Don’t click the Save icon yet.
- DMS Latitude + Longitude from here https://gps-coordinates.org/ (a – minus in the Longitude means “West” so change the Longitude from E to W if this applies to you, then put in the positive number instead).
And remember it is the DMS output you want, not the Decimal version. - Click on the Save icon
- Friendly Name: Something like EQ6-R Pro
- Click OK to save this configuration
6. Use the EQASCOM Toolbox to connect to the Mount
We can now test our connection using the EQASCOM Toolbox. You’ll find this under the EQMOD folder on the Start menu again, or type in “toolbox” in the Cortana search bar on Windows 10.
- Load up EQASCOM Toolbox by finding this under the EQMOD folder on the Start menu.
Tip: “Driver Setup” will take you to the configuration screen in the previous section. - Click on “ASCOM Connect” under Setup. This will load up a screen like below. This is how you will be able to control your Mount. If it connects and shows details about the position of your Mount – congratulations – you have set up ASCOM EQMOD!

At this stage, any software that is able to understand ASCOM can use your Mount. In the next post, we’ll configure Cartes du Ciel (CDC) that will allow us to use point to places on the night sky and our telescope will slew to that position, and we’ll see how this gets used when it comes to my auto-guiding set up using PHD2.
What We Did
ASCOM Platform and EQMOD really is a critical piece of software for your astrophotography needs. With this tool you are able to control a large number of your devices. For my setup, I only use it for controlling my mount.
First you download the platform itself. This is straightforward and installs various dependencies to ensure the platform runs. When that is in place you then download ASCOM drivers. In our case above, we downloaded the ASCOM drivers for a SkyWatcher mount. Once that’s done we then install EQASCOM.
We run the appropriate setup tool, found under the EQMOD folder on the Start menu, to configure our Mount. To get all the details, we needed to know what the Serial COM port was by delving into the Device Manager of Windows, then we continued to fill out the setting up of our Mount by filling in GPS information and saving the set up.
Finally we connected to this using the EQASCOM Toolbox. This is only needed for testing as when we use something like Cartes du Ciel – or even SharpCap Pro, we launch the controls using that software instead.

If I wanted to control the mount through some code (Python or MATLAB or something) do I still need all of these drivers to get the connection to work? I have the serial port SynScan Communication Protocol document. I’ve been trying to days to get the connection to work. The COM port shows up in my device manager, but I can’t seem to get a response from the mount
LikeLike
I’m not sure. You’d have to check the SDKs to see how they would work with the various other pieces of software. ASCOM is a standard interface though, so there might be far more advantages coding to ASCOM standards rather than specifics of programs.
LikeLike